|
|
Post by nicholas on Jun 13, 2013 17:32:34 GMT -7
Some of you guys might know I have been wanting a P90 guitar. I was just about ready to order some humbucker size P90's and convert an existing guitar. I decided to go in a different direction and build my own. Actually 'assemble' my own would be more appropriate. I ordered the kit and it will ship out tomorrow. I'll take some pics along the way and post them. I did my homework on this outfit. From all the reviews online he seems well respected. Even by experienced builders. This should be fun. For 315 buck for the body and neck I really don't think I can go wrong. buy.precisionguitarkits.com/product/double-cut-elegantly-simple |
|
Deleted
Deleted Member
Posts: 0
|
Post by Deleted on Jun 13, 2013 17:36:18 GMT -7
Ah Precision does great stuff. Good luck !
|
|
|
|
Post by BritInvasion on Jun 13, 2013 18:17:14 GMT -7
Man , that is a sweet project! Good luck , keep us posted on how it goes.
|
|
|
|
Post by markT on Jun 13, 2013 19:10:38 GMT -7
Cool deal Nicholas! Can't wait to watch it be born.  Good luck~ |
|
|
|
Post by nicholas on Jun 13, 2013 20:07:57 GMT -7
Thanks. Just finished an order at stewmac for all the hardware and finish supplies. Going with an amber stain and dark grain filler then clear nitro. Tone pros wrap around with adjustable saddles, kluson 3 on a tree tuners, and a Duncan antiquity dogear P90. Going to make my own pickguard and headstock veneer.
Can't wait to get started.
|
|
Deleted
Deleted Member
Posts: 0
|
Post by Deleted on Jun 14, 2013 14:42:12 GMT -7
That looks like a nice kit. Can't wait to hear what you think of it once it's together.
Good luck.
|
|
|
|
Post by Andy 67 on Jun 16, 2013 13:24:17 GMT -7
Looks nice, good luck with the project.
|
|
|
|
Post by nicholas on Jun 18, 2013 19:49:17 GMT -7
I got my finishing supplies. The guitar kit is held up in customs. So I thought I'd take the down time and play around with finishing. There are so many different ways to finish wood. I wanted to do some test pieces and pick my poison. So I made a test board out of a scrap piece of wood and glued down some mohagany pieces I picked up from the local hobby store. Not high quality stuff, but mohagany non the less. Here she be: 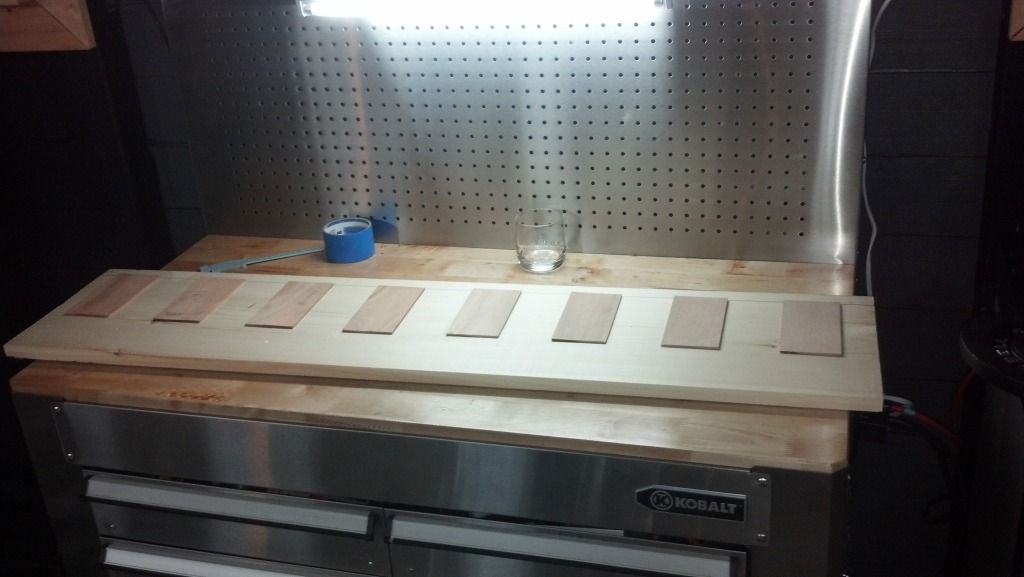 For this I used exactly the same products. Just applied in different orders:  As you can see it make quite a difference in which order you apply. I'm only working with 3 products. Grain filler, amber stain, and sealer. I mixed up my own sealer in a few different concentrations. For sealer I'm using lac flakes dissolved in alcohol. Also know as dewaxed shellac. Think I will go in this direction: 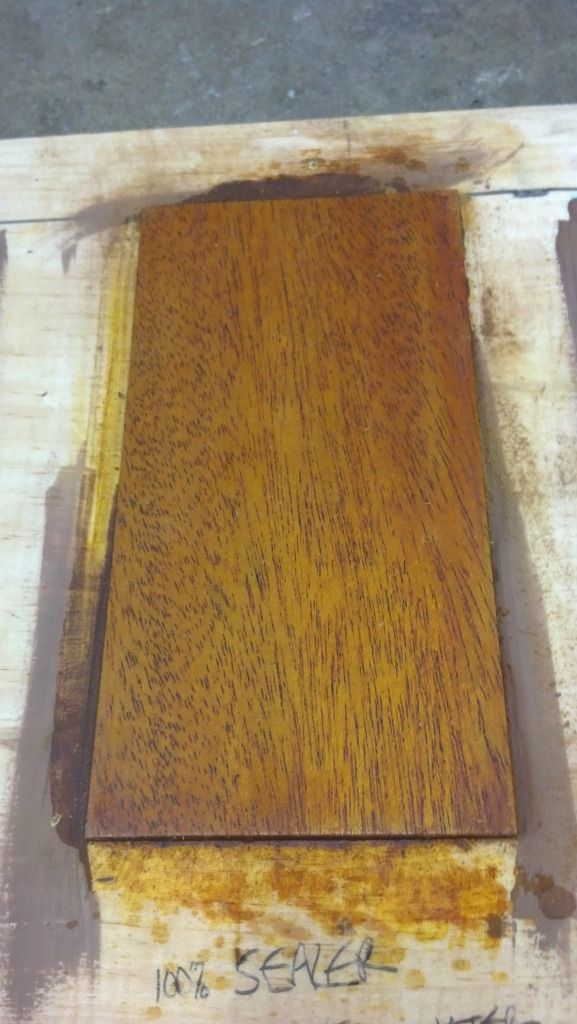 But I'm out if test squares. So tomorrow I'll take my favorite formula and redo the test board with fresh squares. I'm also not ruling out a totally natural finish. A few more days and I should have it down. |
|
|
|
Post by BritInvasion on Jun 19, 2013 4:17:43 GMT -7
That's really interesting. So , different order of application seems to have resulted in progressively darker shades?
|
|
|
|
Post by Jefferson on Jun 19, 2013 10:42:12 GMT -7
i am really interested in how the nitro applies via a spray can. any tests with that yet? i think your test board is a pretty darn smart idea.
kind of like a measure twice, cut once idea.
|
|
Deleted
Deleted Member
Posts: 0
|
Post by Deleted on Jun 19, 2013 10:45:19 GMT -7
Precision has a whole series of 'how to' guitar finishing videos. All done w spray can nitro.
The kit guitar that I bought recently has a spray can nitro finish and it looks great.
|
|
|
|
Post by nicholas on Jun 19, 2013 13:23:10 GMT -7
Frank, it is interesting. It's hard to tell in the crummy cell phone picks. But sealer before stain of vice versa yields very different results. As well as stain before grain filler and vice versa. It seems more about the look you would be after than anything. Stain on bare wood is a no go for me. Everytime it came out splotchy. I'm going to stick with sealer,stain,grain fill,stain,seal. That seems to work best for me.
Jrudder, I have two kinds of spray can nitro. Stewmac and reranch. Again I'll experiment and see what one I like best. I'll post my findings. I shot a little last night. Not enough to form an option though. It smells pretty bad ha ha.
Got my new board started. Going to try a few different color stains as well.
|
|
|
|
Post by nicholas on Jun 19, 2013 16:28:50 GMT -7
Here's a decent example. Both pieces were prepared the same. The one on the left was first grain filled, then stained. The right was stained then grain filled, then restrained. In person they both look nice. Just different. 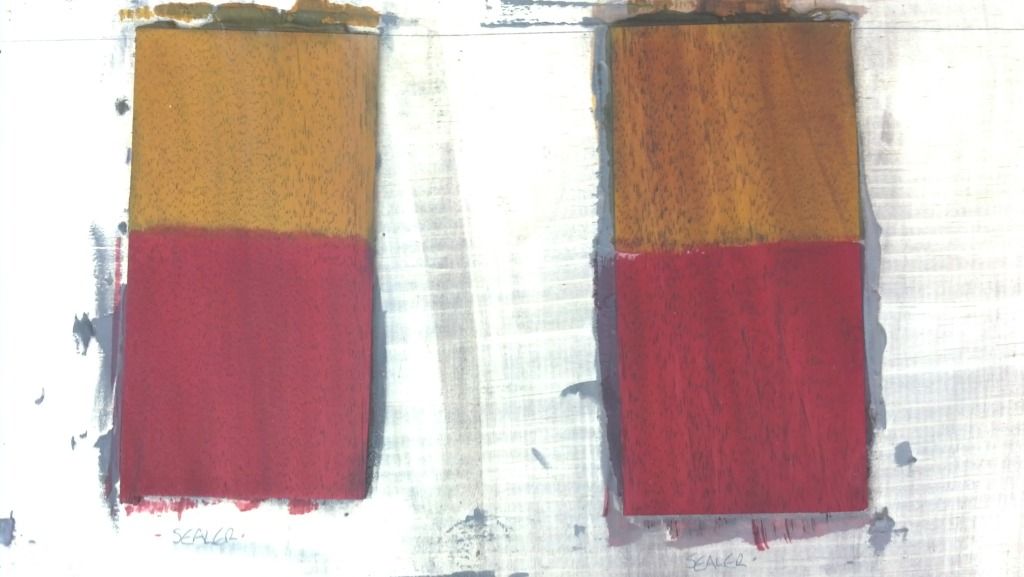 |
|
|
|
Post by nicholas on Jun 19, 2013 20:12:16 GMT -7
After all this experimenting I stumbled on to the grail. You know that mohagany finish that dances in the light like a rainbow trout? That is what all this effort has been for. I had my stain mix off. Now I just have to pick the color..... 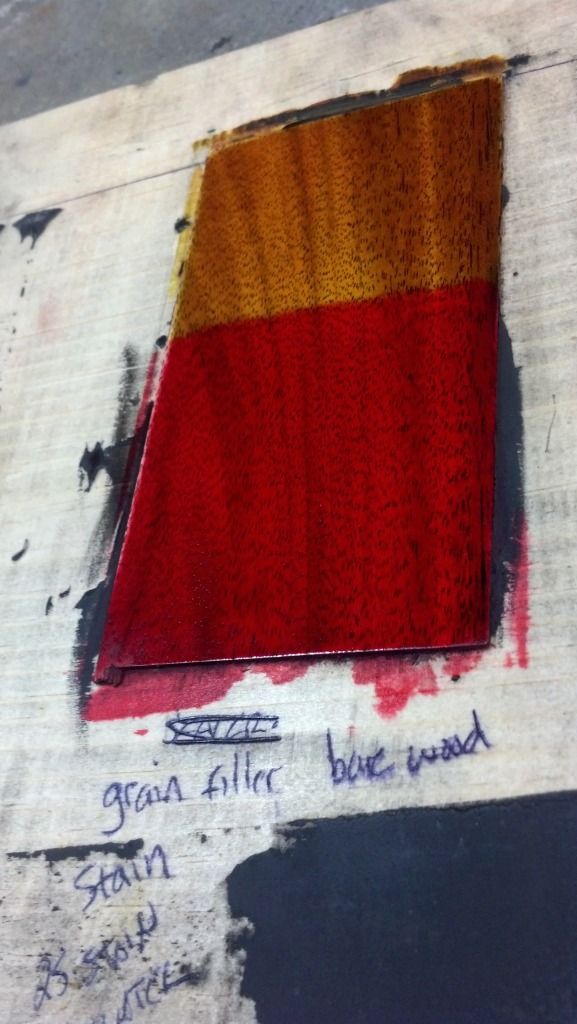 I'm getting better. That's what this is all about. Learning new skills. |
|
|
|
Post by nicholas on Jun 20, 2013 12:59:08 GMT -7
And now it begins..... 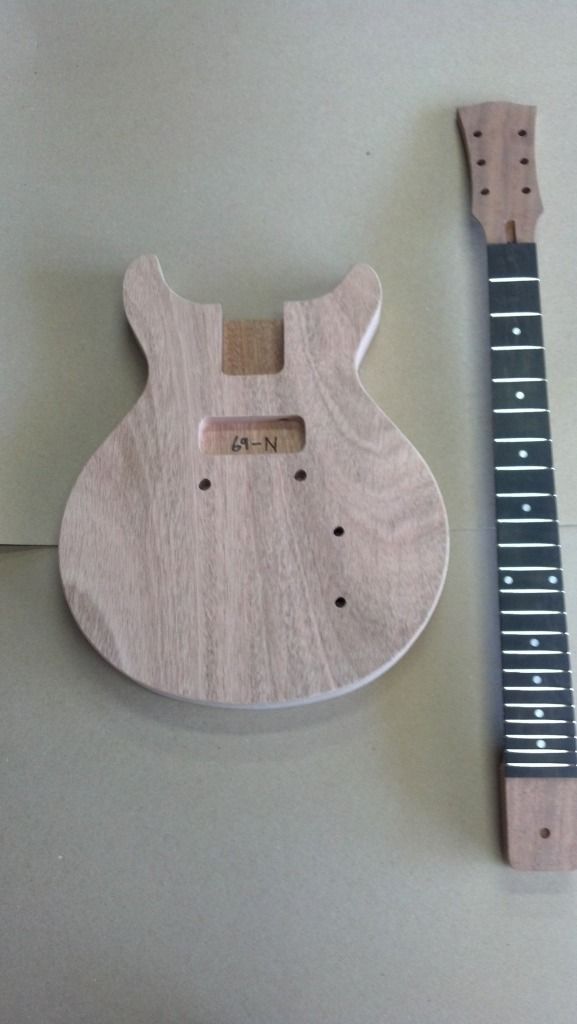  He matched and numbers the neck and body as pairs. 69-N  . It's a nice chunk of wood. The neck joint is really snug, seems perfect. All the routes and cuts are very crisp. This guy knows what he is doing. |
|
|
|
Post by Jefferson on Jun 20, 2013 13:48:37 GMT -7
Dang it! I have done two partscaster projects that turned out really well. now it looks like a LP special style project is being forced upon me by this thread!
thanks a lot Nicolas!
how does the neck joint actually work? do you have to shim/set it at particular angle/s to get it right or is it as simple as gluing it up all square?
great thread!!!
|
|
|
|
Post by Jefferson on Jun 20, 2013 13:49:06 GMT -7
oh, and thank you Eric for posting the video. very informative series.
|
|
Deleted
Deleted Member
Posts: 0
|
Post by Deleted on Jun 20, 2013 15:33:47 GMT -7
there are a lot of threads on LP kit builds over at MyLesPaul.com
Some great information there too.
|
|
|
|
Post by nicholas on Jun 20, 2013 16:15:06 GMT -7
That vid Roscoe linked was cool. Gonna use that handle idea. Feather in the cap ya know.
The neck joint is pretty solid. But there is a touch of up and down movement (in a playing position). I don't think it's enough to worry about. But the first step will be to temporary clamp the neck in and take a few measurements. The movement is so minimal that I really don't think it will make a difference. But its enough to think about. So first I will put in the bridge studs and use a straight edge from my temp nut to the bridge saddles. Then measure from the straight edge to the end of the fret at the last fret wire. Last thing I want is the high E flopping off the fretboard.
Once I pick which way I want to favor I'll jot down a note and save it for later. Again, it's very minimal. I'll also use a straight edge to check the neck pitch. If that's off I'm screwed. I don't have the tools or skills to tackle that.
The neck is awesome. I went with his standard "baseball bat " profile. It feels sweet.
|
|
|
|
Post by BritInvasion on Jun 20, 2013 18:23:54 GMT -7
I like that cherry red in the last photo , looks like the red in a pair of 58 - 59 Juniors I had. Did you order a pre-cut bone nut from Stew-Mac?
|
|
|
|
Post by nicholas on Jun 20, 2013 20:19:17 GMT -7
I like that cherry red in the last photo , looks like the red in a pair of 58 - 59 Juniors I had. Did you order a pre-cut bone nut from Stew-Mac? Thanks Frank. Think I'm going with the red. It's "bright red" color tone stain over ebony grain filler. I actually like both (red and amber). But think the red would look nice with my black pickguard and pickup. I have three uncut bone nuts coming from stewmac. I'm going to mask the nut area and complete the guitar. The nut will be last. Cutting a nut is not in my wheelhouse. So I expect a few attempts at it. Don't want to lacquer in a nut that I will most likely have to knock out lol. In the morning I'll make a temp nut out out of balsa wood just to take some measurements. I'm having a good time with this. It's fun. |
|
|
|
Post by nicholas on Jun 21, 2013 9:33:36 GMT -7
I made my temporary nut out of balsa wood. I measered a nut on a different LP to get the spacing of the low and high e string. Very careful measurements. Then I installed the bridge studs and ground wire. Then I clamped the neck in. I ran some kite string just like I would the actual strings. I used the whole string for the low e, and a single strand for the high e. Over the bridge saddles and through the slots in my balsa nut. Looks dead nuts. There is a hair of lateral movement. Okay maybe a half a hair. When I set the neck I'll pull it as far left as possible. 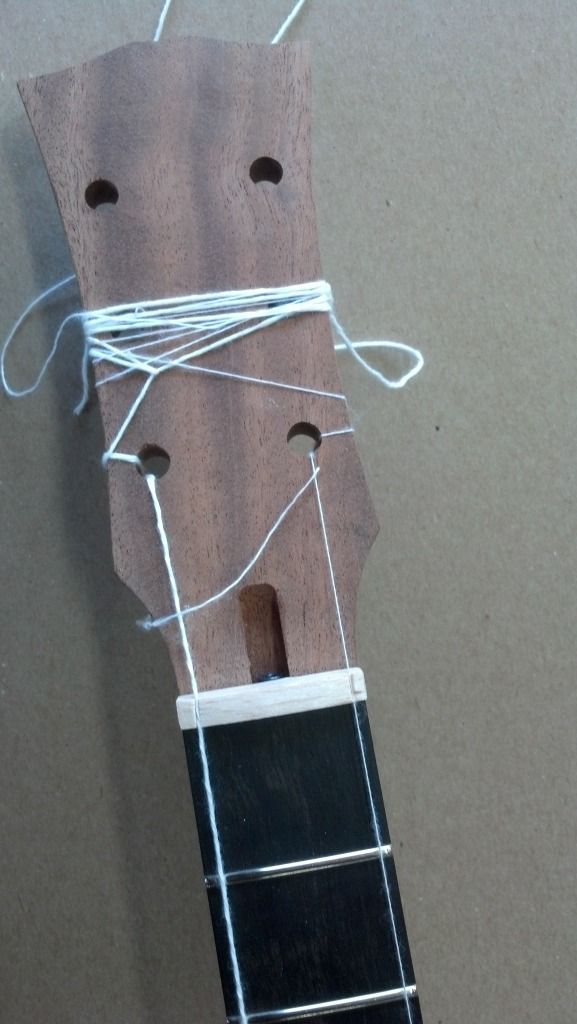 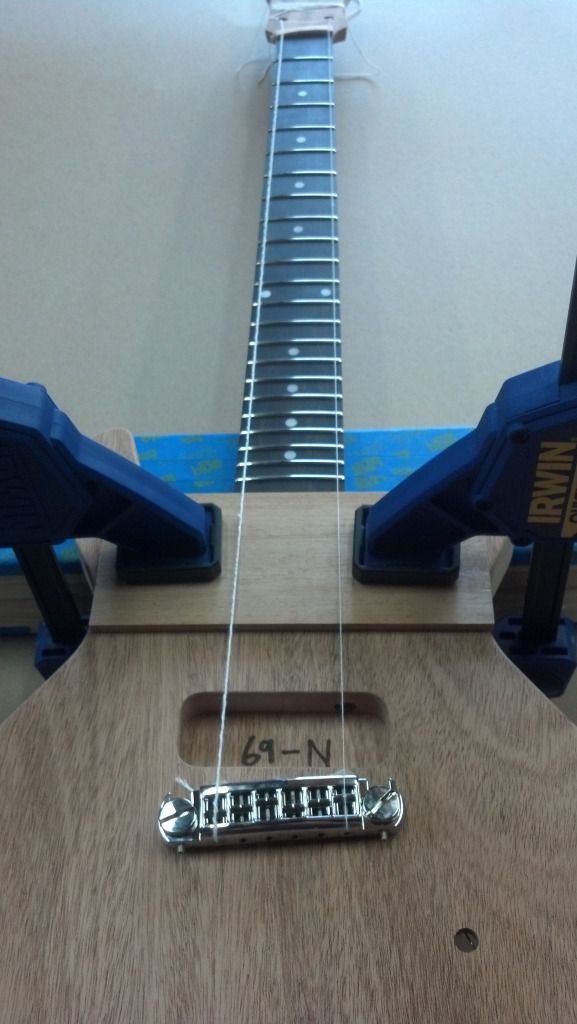 Pulling the neck over left reveals this gap. Its so small I can only insert the tip of a hobby exacto blade. 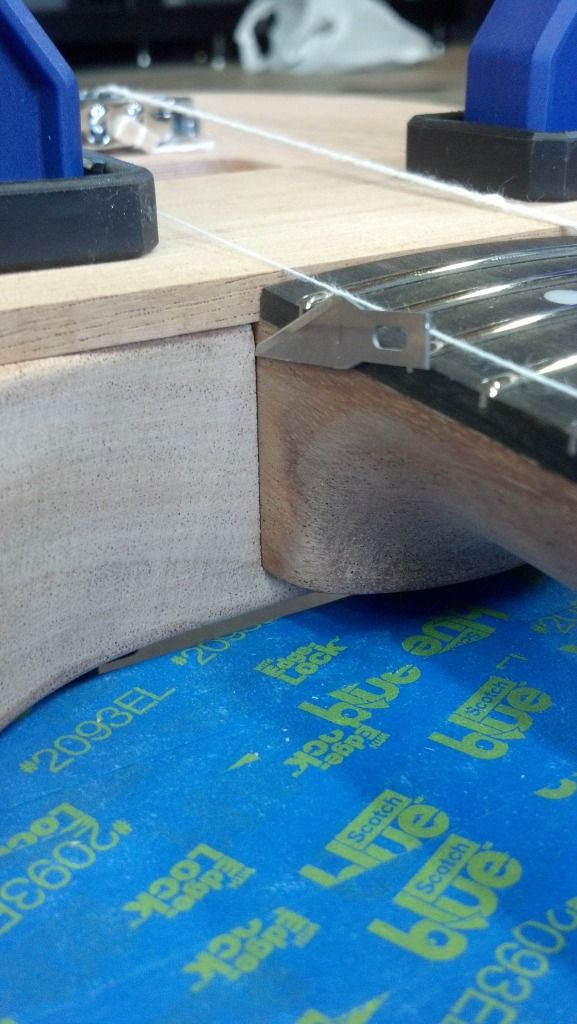 I checked the pitch of the neck with a straight edge from my nut to the saddle and I think it will be fine. So far so good. |
|
|
|
Post by nicholas on Jun 21, 2013 9:34:03 GMT -7
Double post.
|
|
|
|
Post by Maddog on Jun 21, 2013 13:07:16 GMT -7
Awesome Nicholas! Really a fun thread you have going here. Thanks for all the pix!
|
|
|
|
Post by nicholas on Jun 21, 2013 13:15:55 GMT -7
Thanks Lee. Got the body sanded. I used 180,220,320,400. For the top and back I used a large block. For the sided I used a small felt block. It worked well. Not much to add here. Roscoes bid covers all that well. I did what he did. 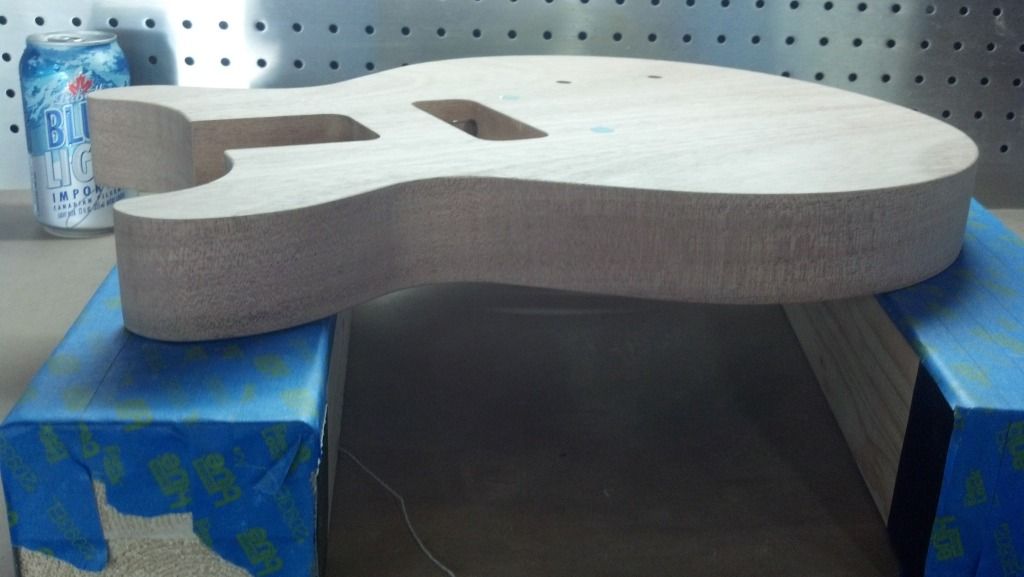 This is coming well. I really hope I don't mess this up..... Now it's beer:30. |
|
|
|
Post by bwc on Jun 21, 2013 13:47:03 GMT -7
Enjoy them beers Nicholas, and thanks for providing all of these photo updates. I've been wanting to do this for a long time, you're kinda helping push me into actually purchasing a kit instead of just thinking about it!
|
|
|
|
Post by KeithA on Jun 21, 2013 15:13:51 GMT -7
Looks good Nik. I'm having a beer right along with ya!
Keith
|
|
|
|
Post by nicholas on Jun 21, 2013 15:40:00 GMT -7
Thanks bud.
|
|
|
|
Post by nicholas on Jun 21, 2013 16:44:36 GMT -7
Practice on the headstock veneer......I found some ebony veneer at the local woodworkers store. I set the veneer on the practice piece and marked a line with a fine tip white grease pencil. I made my mark about 1/8" proud. So the veneer was slightly bigger than the board. I rough sanded the back of the veneer and leveled the practice mohagany board with 320. Then I painted on some titebond wood glue with a hobby brush on both pieced. Then set veneer on the practice headstock. I sandwitched the both between two known level pieces of walnut and put on 4 clamp. I did this this morning. So I popped of the clamps and trimmed the excess veneer with a razor. Then sanded the veneer flush. If it's not painfully obvious I'm a novice with this stuff. So if anyone is reading this and is a novice as well. Spend a lot of time practicing before you attempt it on your kit. 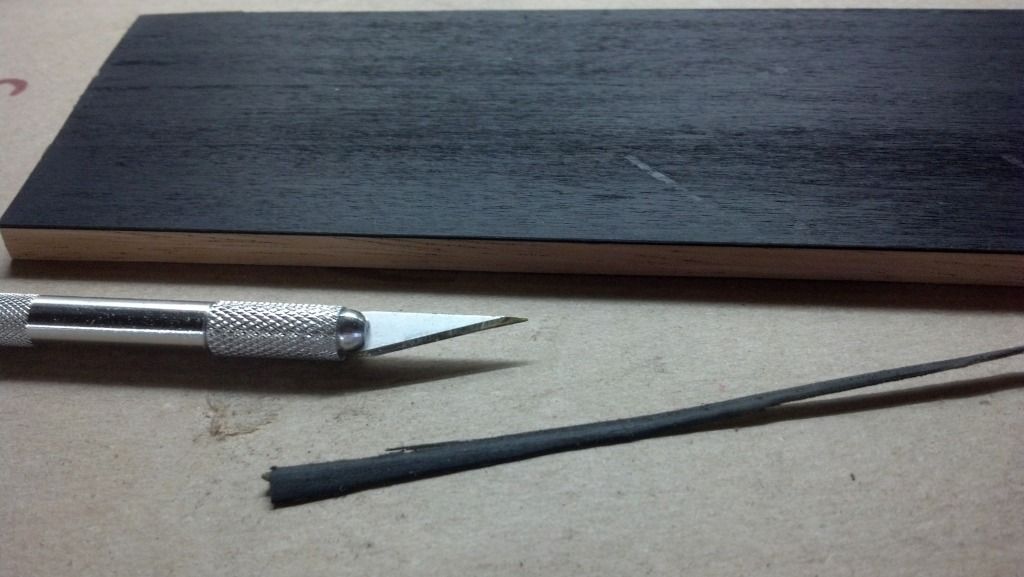 |
|
|
|
Post by nicholas on Jun 21, 2013 17:02:01 GMT -7
The part I dread the most is applying the stain. It's kinda a no turning back point. I have read a bunch of books on this. I have watched a ton of videos. But if you look at my first test board, and compare it my latest examples you can see that actually doing it is how to succeed. I sure hope I do. I have been practicing at nauseum. I don't want to steer anyone in the wrong direction, so don't anybody try any of my finishing techniques I mentioned. I'm still working it out. Up till now I I have been using way to many steps. And IMO every set us a chance for something to go wrong. I also got to thinking there is no way Gibby is doing all those steps. So again.... I redo my test boards. I bought the hobby store out if mogahany. So I'm close. Here is a simple 3 step that I really like. I've repeated it twice. It is also darker and deeper. Picture taken after a few nitro coats:  |
|